Custom Payment Pages
You can create a custom payment page (Payment Link) and embed the link on your site. Customers will be redirected to our payment page to complete their transactions. Need to capture specific info? Add fields to your form and see them reflected in reporting. Once the link has been embedded in your website, you’ll be ready to take payments in seconds! Your customers receive emailed receipts immediately after every transaction.
Please note payment links should not be confused with integrated online shopping carts.
Creating a Payment Link

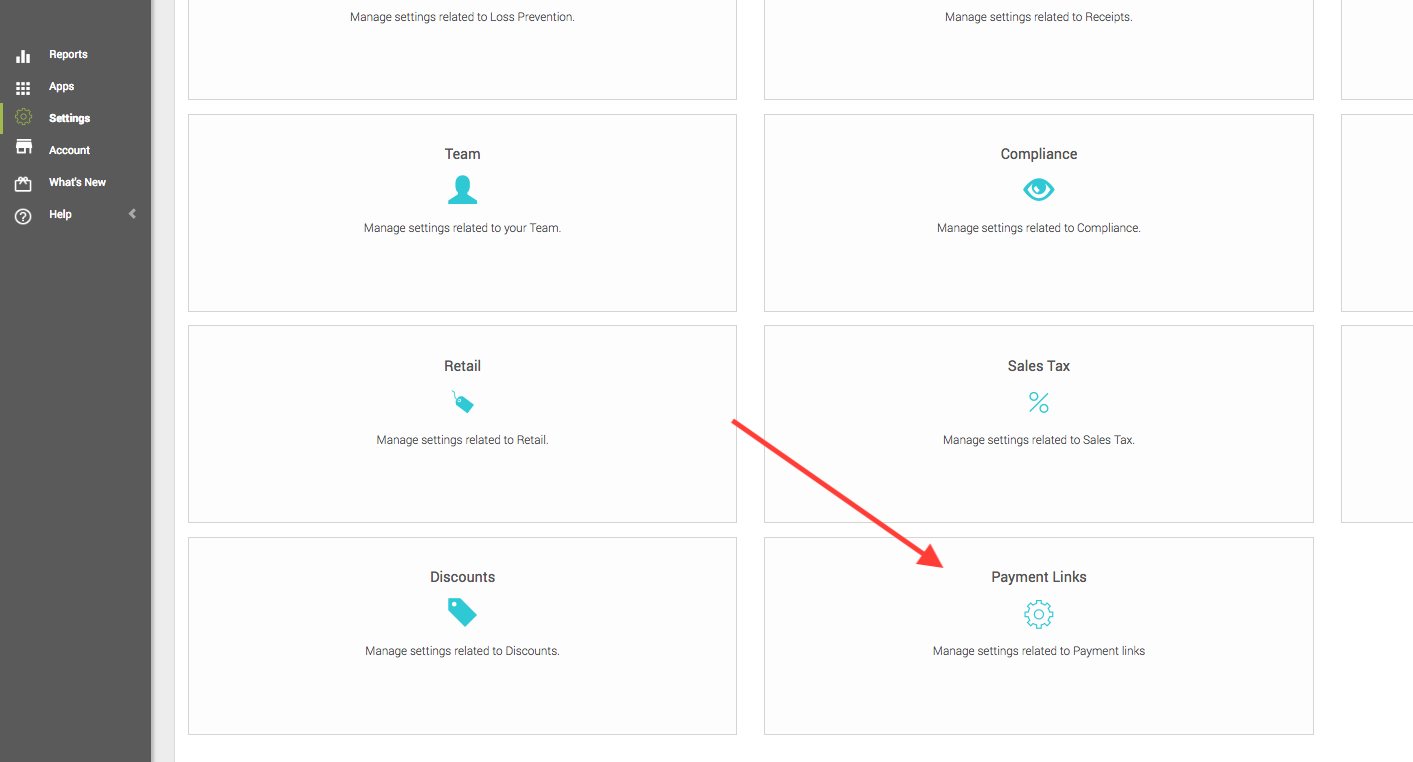
You can create a new payment link in the MX Merchant portal under Settings :: Payment Links or through the API
POST https://api.mxmerchant.com/checkout/v3/device?echo=true

{
   "name":"Example Test",
   "description":"Demo",
   "deviceType":"Link2Pay",
   "merchantId":110000419,
   "enabled":true,
   "onSuccessUrl":"https://www.successfulpaymentlink.com",
   "onFailureUrl":"https://www.failedpaymentlink.com"
}
201 Created
{
   "id":"6f4b9b28-111e-4710-883b-06f5546b54bf",
   "name":"Example Test",
   "description":"Demo",
   "deviceType":"Link2Pay",
   "deviceTypeName":"Link 2 Pay",
   "UDID":"FE481EC9-BF01-45A6-8F2C-128679E9923C",
   "enabled":true,
   "merchantId":110000419,
   "dba":"Test TSYS Merchant",
   "onSuccessUrl":"https://www.successfulpaymentlink.com",
   "onFailureUrl":"https://www.failedpaymentlink.com",
   "updated":"0001-01-01T00:00:00"
}
- Name - A unique name that describes the payment link. This will be important if you have more than one link in use.
- Description - The description field will appear at the top of your payment link and is visible to your customers
- onSuccessUrl - When a payment is made using this link and the transaction is successful the user will be redirected to the URL provided here. This page usually explains to the customer that the transaction is complete.
- onFailureUrl - When a payment is made using this link and the transaction fails for any number of reasons, the user will be redirected to the URL provided here. This page usually explains to the customer that they will need to try again.
- Enabled - You can make as many links as you need and set the status to active(True) or inactive(False). Active means that payments can be made with this link and inactive means that no payments will be accepted through this link.
Adding Custom Fields
You can also add additional custom fields to your payment pages. You can create these custom fields in the first section on the Payment Links Settings page.

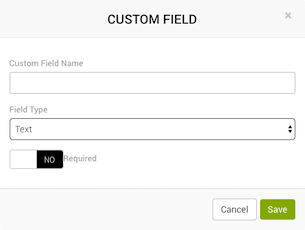
Clicking on Add Custom Field will pop up the Custom Field modal where you can name the field and select the type of field required. We offer the following types of fields:

- Text
- Boolean (Yes/No)
- Number (Integer)
- Decimal
- List (Comma Separated String)
When adding a payment link, you will see your custom fields listed as options to add to your payment link.
Payment Links in the MX Merchant Portal
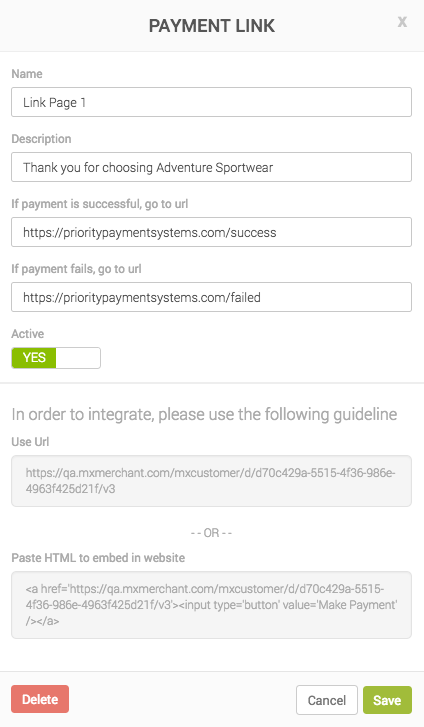
To see more information on an existing payment link in the MX Merchant portal, under Settings :: Payment Links, click on the payment link name found in green within the list. Doing so will open a pop up with the payment link information. If you make any changes make sure to click the save button at the bottom of the pop up in order for your changes to take effect.

The first half of the pop up is the same information you initially sent in. However, the second half is the important part. This can be found by clicking on the payment link name or after you click save after initially creating a payment link.
You will notice you have two options to choose from:
- Use URL - means that you can redirect your customers to a new page entirely (outside of your website) to make a payment.
- Paste HTML to embed in website - means that you will need to have your website manager to add this HTML code to an object within your existing website. This will allow your customers to make a payment without leaving your URL.
*Depending on the payment flow you would like your customers to experience as well as the resources you have available to you in terms of development or website management, one of these options will prove to be better than the other.*
URL Example
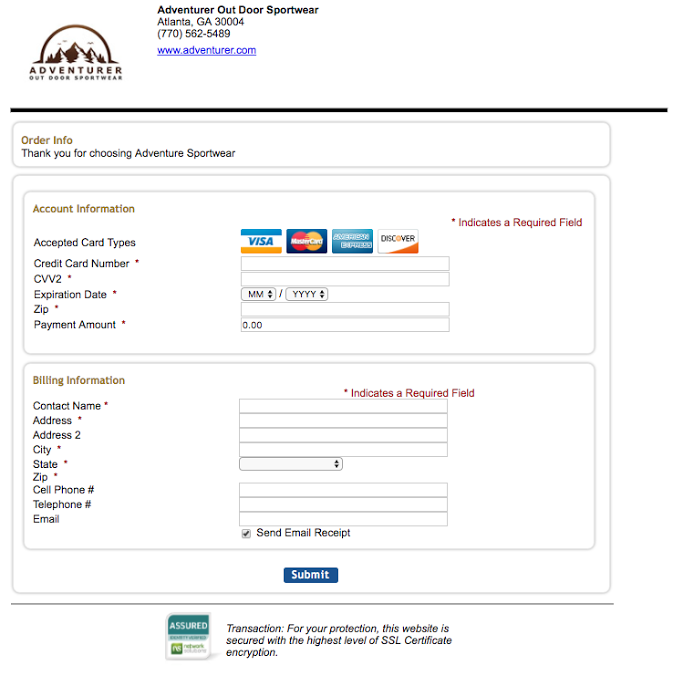
The page that is created for you will look very similar to the image shown below with your merchant's logo in the header and your custom fields, if any, shown at the bottom.

The customer will enter their card information, the amount of the transaction, their billing information, and then click Submit.
Depending on the Success and Failure URLs that you provided in the pop up when you created the link will determine what the customer sees after they click the submit button.
Once a payment is made on this form it will immediately be visible to you within MX Merchant.
Customize your Link
The following table shows all of the additional fields that can be added by manipulating the URL and/or the HTML so you can capture all the information you need when customers pay through your Payment Link page. This is done by adding a query parameter at the end of the URL and an ampersand between each of the parameters. All of are following parameters are optional.
| Query Parameter | Values | Description |
|---|---|---|
| Address | A street address | Populates billing address line 1 |
| AllowPartial | 1 to allow 0 to not allow | If 1(allowed), the amount field is editable |
| Amt | Numeric Float | Amount due |
| City | City | Populates billing city |
| ClientData | JSON Object | JSON formatted custom reporting data |
| CustomerName | Name | Populates billing contact name |
| customerId | MX Merchant Customer ID | Creates an invoice for an existing MX Merchant Customer |
| Email address | Populated billing email | |
| hideRequired | 1 to hide 0 to show | Hides the required label only |
| Lang | en for English es for Spanish | Default display language |
| Memo | Text | Populates Memo Field on invoice. If ShowMemo=1, also shows on the payment page |
| ShowMemo | 1 to show 0 to hide | Displays memo field on payment page; customer can edit. The memo also shows on MX Merchant invoice |
| Phone | Phone number | Populates billing phone number |
| Cell | Phone number | Populates billing mobile number |
| PONumber | Alphanumeric String | Displays in MX Merchant Invoice PO number field |
| showHeader | 1 to show 0 to hide | Displays Merchant logo, name, and address at the top of the payment page |
| showOrder | 1 to show 0 to hide | Displays the Order Info/Device name at the top of the payment page |
| State | Two Character Abbreviation | Populates billing state |
| SystemCustomerId | Alphanumeric String | Non MX Merchant Customer Id |
| Zip | 5 digit number | Populates billing zip |
Sandbox vs Production
We added extra security so payment links are more protected against bots and attacks that spam credit card numbers, which can damage the merchant's account. The extra security has likely caused this discrepancy between Sandbox and Production. Thus causing you to see errors you would only see in production
Updated about 5 years ago
